Custom Scenery Exchange / Easy tree tutorial!
-
 03-July 13
-

 Liampie
Offline
This tutorial is about making custom trees using existing trees. If you don't use existing trees, you'll probably end up with trees that do not fit in RCT's graphics. These fit, guaranteed! It's really not very difficult to do if you're handy with paint. I hope this tutorial invites other people to make new trees, because there are never enough RCT-fitting trees. Especially large trees.
What you need:
- Object editor (you don't have to be very skilled)
- Paint (I use the old paint, not sure if things would be different with the new paint)
- Parkdat (optionally)
Step 1
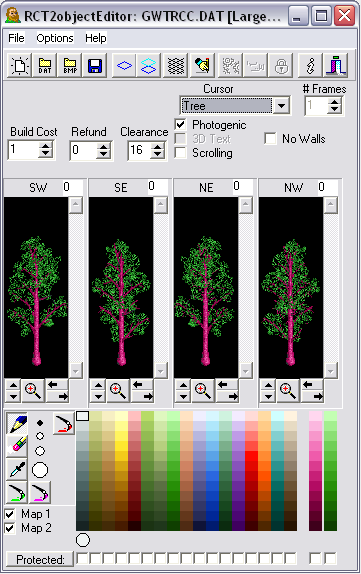
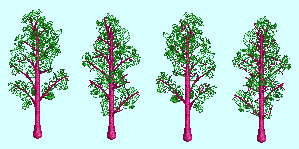
In this tutorial I'm going to make a large chinese cedar out of a normal colourable chinese cedar. To get the chinese cedar images, opened GWTRCC.dat* in the Object Editor**. The Object Editor is not a very handy tool to work with, especially for making larger objects like a tree, so we need to get the tree images into paint. With your right mouse button you can copy+paste the images to paint, one by one. When pasting in paint make sure that the backround colour is transparant! Also, make the paint file really large so you have plenty of room to move and drag things around in a later stadium.
* There are several ways to get to know a dat's name: you can look up the object in the rct2objectlist, but if you know which savegame may contain the object you're looking for just open that savegame with Parkdat. The rct2objectlist is not complete and a savegame is more easy to navigate. Ideally, you find the object you're looking for in game. Memorize the in game name of the object, and search for that name (for example use the word 'cedar') in parkdat to quickly locate the object.
** It's also possible to extract the images from a screenshot.
Step 2
The average tree consists of a trunk and leaves. In turn we need to extract those from the images we just extracted. We'll be using this tool a lot: In this case it's a really easy job since the chinese cedar is not very dense.
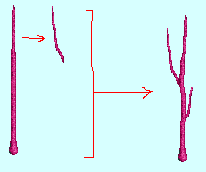
With the same paint tool, you can copy+paste parts of the trunk you extracted and rearrange them in several ways. You can stack several parts of the trunk to make it higher, or you can shift pieces horizontally to make the tree more crooked*. Also, I made a branch out of the top! And I made another branch out of that branch! It's really just a matter of copying, pasting and shifting. It's a good idea to make several versions for variation. You can also mirror your trunk, but when you do the shading is off which you have to fix my mirroring the trunk again in phases. If you know what I mean.
* When you do this, I recommend also lowering the piece one pixel, otherwise it looks silly. Especially the thinner the trunk is.
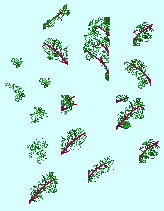
As for the leaves, just cut out a bunch. Doesn't even have to be very precise as long as you include the branches. This is what I got:
Step 3
Now it's getting fun, actually. You know those online dress-up games in which you have to drag clothes and shit onto a model or an animal*? Example (SFW). This is pretty much the same idea. The trunk is the model and the leaves are the clothes. Take a trunk**, and place it next to your leaf collection. Zoom in so that both the trunk and the leaves/branches are on screen. Now just start adding the branches to the trunk. Because we want the chinese cedar to become larger than the original, place the branches further out from the trunk. They'll float, but we fix that later. Continue until it starts to look like a tree. I think this is how the original RCT artists did it, because most trees contain repetitive leaves and patterns.
Fun fact: the tree top I used is exactly the same as the original trees. The tree tops are not in my leaf collection because it was a spontaneous idea.
* Remember the Giraffe dress-up game JJ made? With the leather suit and the terrible music playing in the background? I made the music.
** Always copy, don't drag, because you want the save the individual components for later use. You don't want to start the whole process again because you accidentally covered your only trunk without having a copy sitting somewhere else in the file...
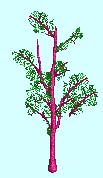
(this is obviously not a very good attempt. I didn't make screens when I originally made this tree, so I quickly threw something together for this tutorial. Also, I only remembered I used the default tree tops AFTER I made this screenshot...)
Step 4
There might be gaps in your tree. Note in the screen of my leaf collection that there are leaves without branches on the right. These are great, because you can reshape, mirror and rotate these without changing the shading. Go wild with these and place them anywhere on the tree. You can fill up the gaps with these, as well as make the whole tree denser. Go wild! Lastly, connect the floating branches to the trunk manually. Pick and use colours from the branches and trunks for consistency.
End result:
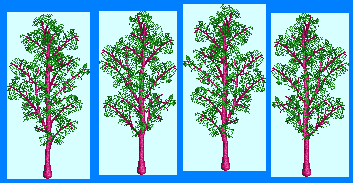
Step 5
Save your paint file (with the newer windows versions, make sure the colours don't get all fucked up!). Open the Object Editor and make a new large scenery object. The tree I made is too large to fit on a single tile, so I selected a 2x1 surface for my new object. This may be a weird size for a tree, but there's no need to make it any bigger than necessary, and it's always nice to have objects that are more independent from the RCT grid.
In the last screenshot you may notice the blue boxes around the trees. This is so you can select them more easily. When doing this, it's very important to select the tree EXACT. No rows of empty pixels on the sides. Preferably no empty rows on the top or bottom either, but the sides are more important. Copy and paste the trees back into the Object Editor. To remove the background colour you used in paint, which was a soft light blue in my case, 'protect' the two colours on the right by ticking the boxes found at the bottom of your window, then use the eraser all over your image. You can't hurt the tree, because those colours are protected.
Switch on 'base and top outline'. Position the tree where you want to have it using the arrow buttons. Make sure all trees are more or less in the same spot. Doesn't have to be too precise, because nature isn't precise. Set the clearancesso that the whole tree is contained. If you don't do this, your object will most likely glitch. Tick both 'map 1' and 'map 2' boxes a the bottom left of the window so you can recolour the trees in game. Lastly, add a name/description for your object. Fun fact: I always use British spelling for all languages except for US English. So that's 'recolorable tree' for Americans, and 'recolourable tree' for everyone else. I'm such a nerd!
Save your object, NOT in your objdata folder but some place else. Also VERY important: be sure that the dat name you use doesn't exist already. My dats all start with LMP which makes them almost unique. Kumba uses 1K, an even more distinctive 'signature'. When making a new object I know which dats there are that begin with LMP; in other words it's less likely that I pick a name that already exists.
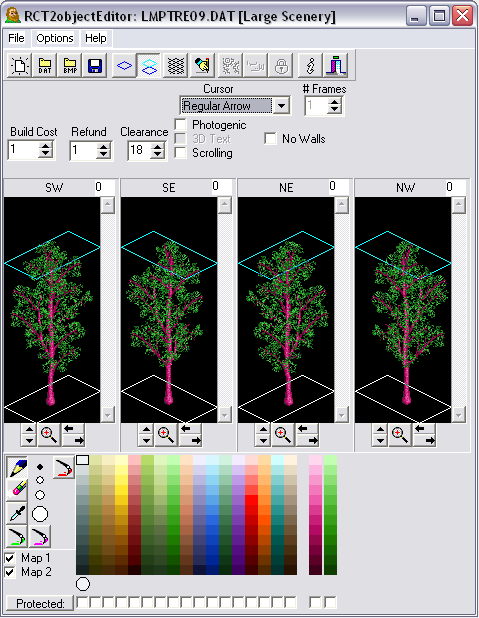
Step 6
Test your object! Manually copy it to your objdata folder. I recommend testing it in the scenario editor. If your objdata folder is too full however, it's possible that you cannot scroll in the scenario editor and therefore cannot select and view your object. In that case you'll have to use parkdat to get it on a savegame. When you decide to change your object after viewing, you have to delete your object from your objdata folder as well as from the savegame(s) manually. Load RCT and the savegame after doing so.
That's all there is to it. The chinese cedar took me less than an hour to make.
Variations
Immediately after the chinese cedar I started to work on the weeping willow, which was very high on my priority list. It was slightly harder than the chinese cedar, but not as hard as I expected... I started with making a full bare tree (which I may turn into a seperate object someday, might come in handy for winter settings! Just ask if you want it already). Extracting the leaves from the birch was not too easy, but it's managable. Some of these branches (they look more like bushes) are composites themselve actually. I made the hanging leaves slightly longer at the bottom, to achieve that 'weeping' look. I love the end result, and this tree will be released soon.
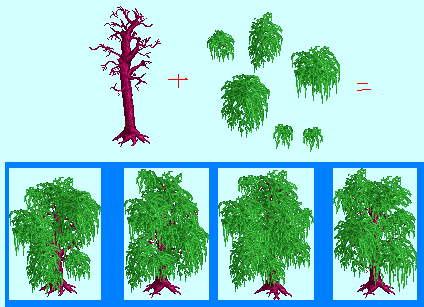
Recently I also made a small waterside birch, which was silently released in Dimi's landscaping prelim (you probably missed it!). This was the toughest object I ever made. I made the leaves out of a silver birch, but used several other trees to get a trunk collection going. I barely used any of these in the end, but it's good to build such a collection. I think I eventually used the tree on the left's bare branch (on the left) to make the trunk's bottom in both versions, with a deformed canary palm stacked on top. The rest of the tree is very thin, so pixel-by-pixel drawing is not really an effort anymore. I think I drew all that manually. The problem that arose then was that the trunk was too dark. I don't feel like explaining how I did it, but I managed to make the whole thing three or four RCT-shades lighter. Then I had to add the birch-stripes to the tree, which was harder than I imagined. This again is a matter of pixel-by-pixel drawing. I'm not 100% satisfied with the end product, but with the trunk covered with leaves up I like it enough. Regarding the leaves, I thought it would be very hard to cut these out from the birch, but it turned out to be the opposite. No matter how I cut circles and stuff in the birch, in the end it always looked fine when I jagged the edges.
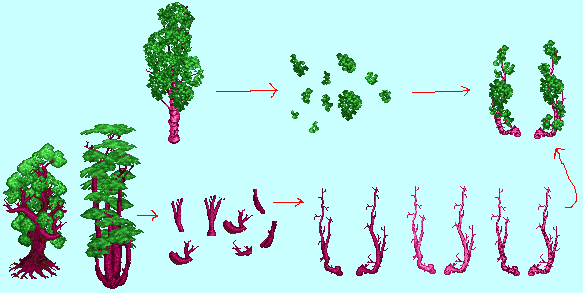
If there are any questions, let me know. Also I suggest we don't be too secretive and possesive about new objects. I'm sharing this tutorial because I want help people to help people. Having 20 new good looking trees could be a revolution. Share! -

 Louis!
Offline
I think this is the best thing you have done for the site Liam.
I hope that this encourages people to make their own custom trees so that one day we have a large collection of various trees.
Again, thankyou for building these trees, but also thankyou for finding an easy way and showing us how
Pinned. -

 Liampie
Offline
Wow Liam!
I'm greatly impressed!
Great job, respect.
Can we expect some attempts from you? -

 Arjan v l
Offline
^^ SURE!!!!
P.S.
Sorry to the both of you, for the other day, when i lost my self control (once again).
I know you and Louis work your ass of for NE.
It was selfish what i did.
I'm going to be less active for a while though, just to get things straight in my life.
Lately, i've been taking rct way too serious, wich isn't a good thing in my case.
I'm working on a curved waterfall though, always trying to raise the bar. -

 Kumba
Offline
In that case please hurry up and release that last jumpo Willow looking tree with the wide root base!I suggest we don't be too secretive and possesive about new objects.

Great tut Liam. We pretty much do our objects the same way. I also use MS paint and always have. I think some tuts or streams on basic object making would be good too. Show people it's not hard at all to use the editor.
My only planned tree project is a Banyan Tree set for the Key West area in DR3.
Looking forward to a release of your full tree set/RCT tab. This is great stuff!
-

 Liampie
Offline
In that case please hurry up and release that last jumpo Willow looking tree with the wide root base!

Right here!
http://www.nedesigns...-object-studio/ -
 render8
Offline
Really nice tutorial Liam. Amazing how using just existing graphics can give so many possibilities. Thanks so much for sharing your methods.
-
 JJayMForce
Offline
Nice, Liam. I'm going to attempt a 'large' quarter tree to fill all those spaces in Hershey.
Also, isn't it a good idea to try and have your tree objects in the large scenery tab if possible, like G did with his? So you don't have to take up slots from your small scenery tab. I guess you would do that by building over an already existing large scenery object and save it as something else. -

 AK Koaster
Offline
Wow, Liam. Very excited to try this, can't wait to see how foliage will evolve with this simple process! Just need to practice with object editor.
 Tags
Tags
- No Tags